


Rithvik Singh
March 31, 2025
5 Minutes read
Enhancing User Experience: Build an Intuitive Service Request Flow in Salesforce
In today’s fast-paced business environment, efficient communication and streamlined processes are paramount. Many organizations face the challenge of managing support tickets across multiple platforms, which can lead to inefficiencies. Let consider a scenario, where tickets were created both through Salesforce’s email-to-case functionality and manually within a separate communication hub.
This dual system, while intended to facilitate collaboration, presented several challenges. For instance, agents had to manage the same ticket in two separate locations, leading to potential inconsistencies and increased workload. Updating a ticket in Salesforce requires a manual, duplicate updating in another system creates room for errors and oversight. Essentially, maintaining two systems for one purpose can be inefficient and prone to discrepancies.
Therefore, after recognizing the problems that arise from using multiple systems, organizations often make the strategic decision to consolidate their support processes entirely within Salesforce. This blog post will explore a solution that addresses these challenges, detailing the requirements, alternative solutions considered, design choices, and overall benefits. Come along as we explore how a solution like this can transform the support request process, making it more efficient, user-friendly, and fully integrated within the Salesforce ecosystem.
Understanding the requirements
The initial approach of managing support tickets across two platforms—Salesforce and a Separate communication hub—can prove redundant and inefficient. Maintaining the same ticket information in two separate locations created unnecessary work, increased the potential for errors and inconsistencies. This duplication of effort highlighted the need for a unified solution within Salesforce.
While Salesforce has email-to-case functionality for external users, a user-friendly way for internal users to manually create tickets directly within the Salesforce environment is often needed. Many internal users lacked extensive Salesforce expertise, making it difficult for them to navigate the platform and create cases effectively. Therefore, it’s often necessary to develop a dynamic and intuitive solution within Salesforce that would empower all internal users, to easily create support tickets based on their specific needs.
A primary requirement is to provide internal users with a single, easy-to-use form where they could input all necessary information, guided by dynamic prompts based on their selections, ultimately creating a Salesforce case, as illustrated in Figure 1. A solution like this simplifies the process, ensuring that users can efficiently provide all the necessary information upfront and improving the overall support experience.
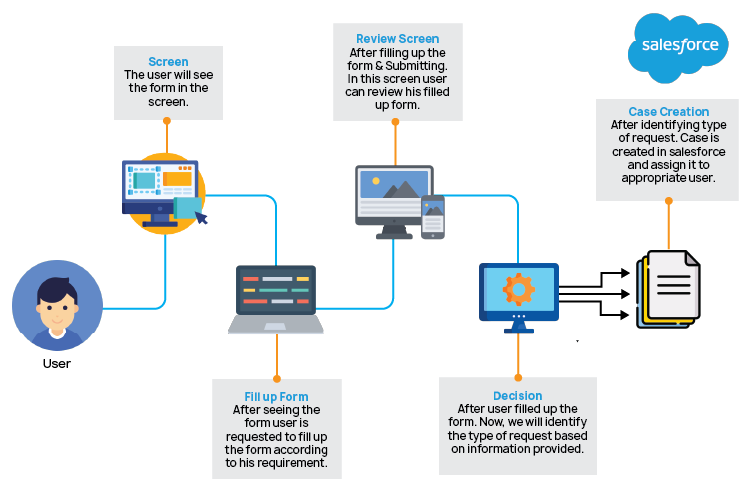
Figure 1: Basic workflow of our requirement
To achieve this, developers can develop a Salesforce Screen Flow that simplifies and streamlines the entire support request process. The flow will guide users through a dynamic form, ensuring that they provide the right information upfront, and automatically creates a case record in Salesforce.
Exploring the alternatives solution & why flow?
For this requirement, alternatives like Lightning Web Components (LWC) or Visualforce pages can be considered.
LWC would allow for a highly customized and responsive user interfaces but,
- Requires coding expertise
- And take longer development time.
Visualforce page offers more design freedom and complex functionality but,
- Powerful but requires coding.
- Less user-friendly compared to Flow.
Other declarative options like Workflow Rules and Process Builder were too limited for the dynamic form and guided user experience needed.
For the above reason, Screen Flow offers the best balance. It enabled us to create a user-friendly dynamic form. It provides:
- Easy to use functionality of salesforce for automation process.
- No extensive coding required – built using a drag-and-drop interface.
- Dynamic and user-friendly – guides users through a structured process.
- Easier maintenance compared to custom-coded solutions.
- Balanced approach – powerful yet simple to implement and manage.
Furthermore, some might question why a Screen Flow is being chosen or alternative approaches explored when Salesforce already provides standard functionality for case creation. While record types within the Case object could be utilized to customize the process based on requirements, this alone might not fully meet the needs. Specific requirements might include file upload capability within the form, rich text support for the Description field, and dynamic display messages based on selected picklist values. These additional functionalities often necessitate a more flexible and user-friendly solution, making Screen Flow an ideal choice.
Deep Dive into the Screen Flow
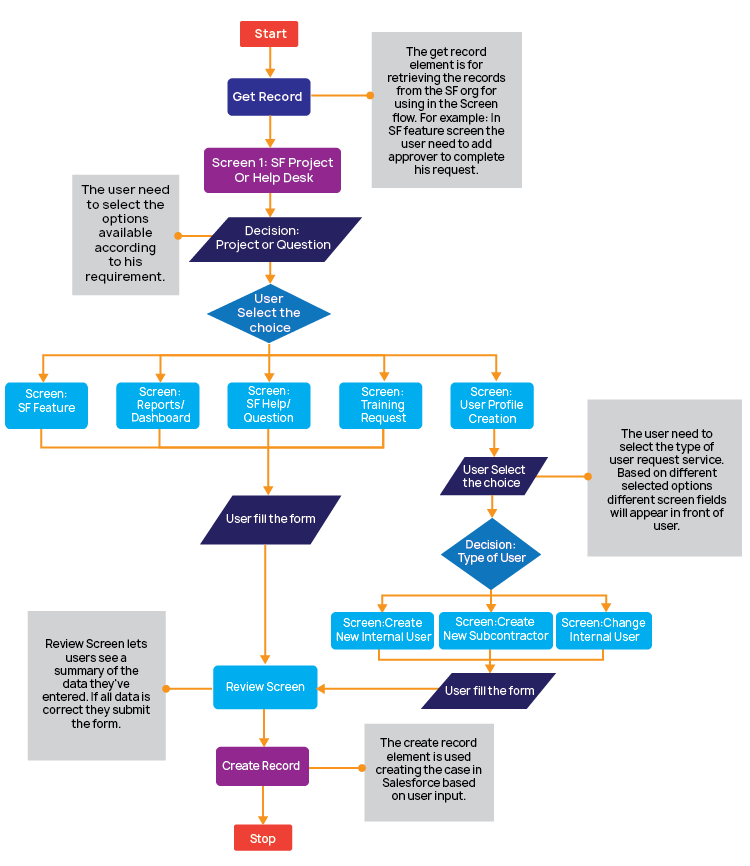
Figure 2: Architecture Overview of Screen Flow
Explanation of Figure 2
- Start: The flow begins with the user initiating the help request process.
- Get Record: The get record element is used to get the approver list of users used in SF feature screen.
- Screen 1: Project or Help Desk: The user selects the type of request (Project or Question).
- Decision: Project or Question: The flow branches based on the user’s choice.
- Screen: SF Feature / SF Help/Question / SF Reports/Dashboard / Training Request / User Profile Creation: Context-specific screens are displayed based on the initial choice.
- User Select the Choice/User Fill the Form: Users interact with the dynamic forms, providing necessary information.
- Decision: Type of User: The flow branches again based on the user’s role (Internal User or Subcontractor).
- Screen: Create New Internal User / Create New Subcontractor / Change Internal User: Specific screens for user creation/modification are displayed.
- Review Screen: A summary screen displays the entered information for review.
- Create Record: Upon confirmation, a case record is created in Salesforce to track the help request.
- Stop: The flow ends, and the user is notified of successful submission.
Comparison to previous process
Ticket Creation
- Previous Process: Manual entry in Salesforce (sometimes cumbersome) or via email-to-case and also duplicate entry/management in separate communication-hub. This involved multiple systems and potential data discrepancies.
- New Process: Single, dynamic form within Salesforce, guiding internal users through the necessary information based on their selections. Streamlined and user-friendly, eliminating the need for multiple systems.
Reporting and Tracking
- Previous Process: Difficult to generate comprehensive reports due to data being spread across multiple systems. Tracking key metrics was challenging and time-consuming.
- New Process: Centralized data within Salesforce enables easier and more accurate reporting and tracking of key metrics, providing valuable insights into support performance.
User Experience
- Previous Process: Confusing and cumbersome, especially for users less familiar with Salesforce. Multiple systems and inconsistent processes created a frustrating experience.
- New Process: Intuitive and user-friendly, simplifying the ticket creation process for all internal users, regardless of their Salesforce expertise.
Efficiency
- Previous Process: Inefficient due to redundant work, incomplete information, and fragmented communication.
- New Process: Streamlined and efficient, reducing agent workload, improving resolution times, and enhancing overall support operations.
Collaboration
- Previous Process: Collaboration often occurred in a system separate from the Salesforce record. This made it difficult to track communication related to a specific case and created a fragmented view of the support interaction.
- New Process: All communication and collaboration occur within Salesforce, leveraging the feed tab. This provides a centralized and easily accessible history of all interactions related to the case.
Best Practices while creating flow
- Plan and Design: Before building the flow, clearly define the requirements, user journey, and data elements involved. Create a diagram or flowchart to visualize the flow’s logic.
- Use Descriptive Names: Use clear and descriptive names for flow elements, variables, and decisions to improve readability and maintainability.
- Test Thoroughly: Test the flow with various scenarios and user inputs to ensure it functions correctly and meets the requirements. Use debug logs and the debug tool to identify and resolve issues.
- Keep it Simple: Avoid overcomplicating the flow with unnecessary logic or features. Focus on the core functionality and keep the flow as simple as possible.
By implementing a well-designed Screen Flow, organizations can successfully consolidate service request processes within Salesforce, eliminating the inefficiencies of managing tickets across multiple platforms. The flow empowers internal users to easily submit requests, regardless of their Salesforce expertise, and provides a structured, guided experience. The dynamic nature of the flow ensures that all necessary information is captured upfront, leading to more complete and accurate records.
The use of Screen Flow offers a no-code solution that provides the necessary flexibility and control to meet complex requirements, including file uploads, rich text descriptions, and dynamic messaging. This demonstrates the power of Salesforce Flows in creating robust and customized solutions without extensive coding.
Salesforce Flows can deliver seamless user experiences with intuitive Screen Flows that enhance efficiency and accuracy. A tailored approach optimizes workflows, reduces complexity, and improves overall productivity.
ACL Digital delivers seamless user experiences with intuitive Screen Flows that enhance efficiency and accuracy. Our tailored approach optimizes workflows, reduces complexity, and improves overall productivity. Get in touch with our experts at business@acldigital.com to explore how ACL Digital can enhance your Salesforce experience.
Related Insights