
Vikas Mishra
8 Minutes read
Transitioning from Classic Load Balancers to Advanced Solutions
In the digital landscape, where applications are expected to deliver exceptional performance, security, and scalability, Classic Load Balancers (CLBs) often need to catch up. Their routing capabilities, protocol support, SSL features, and performance limitations can hinder the overall user experience and application efficiency.
Migrating from Classic Load Balancers (CLBs) to advanced load-balancing solutions is crucial for unlocking your application’s full potential and addressing limitations. This guide offers a clear roadmap for transitioning your infrastructure to either Application Load Balancers (ALBs) or Network Load Balancers (NLBs), with step-by-step instructions for manually or automatically creating these new load balancers based on an existing CLB within a VPC.
Manual Migration Process
To migrate to a newly created Application Load Balancer or Network Load Balancer from an existing Classic Load Balancer in a VPC, you can use the AWS Management Console, the AWS CLI, or an AWS SDK.
Step 1- Create a new load balancer
Create a new load balancer with a configuration mirroring the existing Classic Load Balancer.
- Create a new Application LB with the same scheme (internet-facing or internal), subnets, and security groups as the Classic Load Balancer.
- Set up a target group for your load balancer using the same health check parameters as your Classic Load Balancer.
- Do the following changes:
- If Classic Load Balancer (CLB) is attached to an Auto Scaling group, attach the target group to the Auto Scaling group. The Auto Scaling group’s instances are also automatically added to the target group. Register EC2 instances with the target group.
Configure one or more listeners, each with a default rule that routes requests to the target group. HTTPS listeners can use the same certificate as the Classic Load Balancer. We recommend using the default security policy. If your Classic Load Balancer has tags, review them and apply the appropriate tags to the new load balancer.
Migration Wizard Process
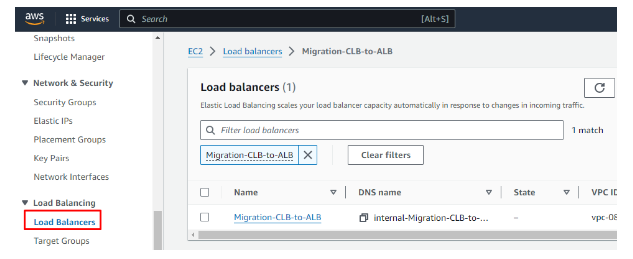
- Open the EC2 console at https://console.aws.amazon.com/ec2/.
- In the navigation pane, under Load Balancing, select ‘Load Balancers.

- Choose the Classic Load Balancer you want to migrate.

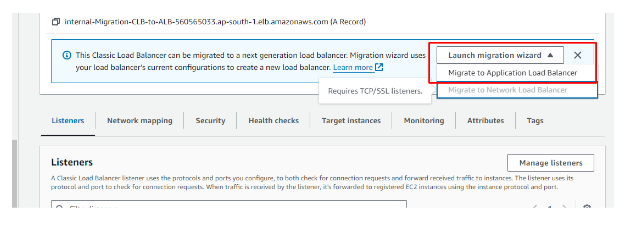
- In the load balancers Details section, choose Launch migration wizard.

- Choose Migrate to Application Load Balancer, or Migrate to Network Load Balancer, to open the migration wizard.
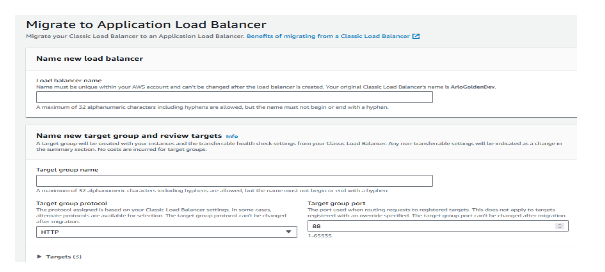
- Under Name new load balancer, for Load balancer name enter a name for your new load balancer.

- Under Name new target group and review targets, for Target group name enter a name for your new target group.
- (Optional) Under Targets, you can review the target instances that will be registered with the new target group.
- (Optional)
- Under ‘Review tags,’ you can inspect the tags that will be associated with your new load balancer.
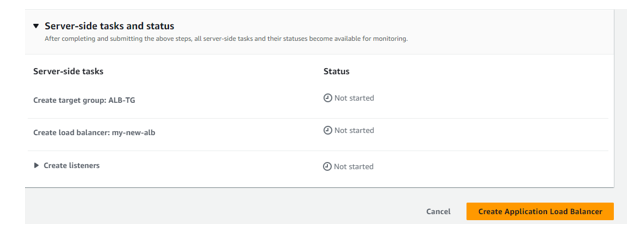
- Under Summary for Application Load Balancer, or Summary for Network Load Balancer, review and verify the configuration options assigned by migration wizard.

- After you’re satisfied with the configuration summary, choose Create Application Load Balancer, or Create Network Load Balancer, to start the migration.

Step 2- Transitioning traffic to your new load balancer
Once the instances are registered with the new load balancer, you can shift traffic from the old one to the new one. This gradual redirection allows you to test the new load balancer’s performance while minimizing any potential impact on your application’s availability.
Gradually shift traffic to the new load balancer
- Paste the DNS name of a new load balancer into the address field of an internet-connected web browser. If everything is working, the browser displays the default page of the application.
- Create a new DNS record that associates the domain name with a new load balancer. If the DNS service supports weighting, specify 1 in the new DNS record and 8 in the existing DNS record for the old load balancer. This directs 10% of the traffic to the new load balancer and 80% to the old one.
- Monitor the new load balancer to verify that it receives traffic and routing requests to instances.
Migration diagram
Drawbacks of CLB
CLB was one of the first load-balancing services offered by AWS. Compared to the more modern Application Load Balancer (ALB) and Network Load Balancer (NLB), it has several drawbacks.
Limited Protocol Support
- No Web Sockets or HTTP/2 Support- CLB does not natively support modern protocols like Web Sockets or HTTP/2, which are increasingly important for modern web applications.
- Limited to HTTP/HTTPS and TCP: CLB only supports HTTP, HTTPS, and TCP protocols, whereas NLB offers additional support for UDP, and ALB supports enhanced HTTP/HTTPS features.
Lack of SSL/TLS Features
Limited SSL Termination- CLB has basic SSL termination capabilities and does not support features like Server Name Indication (SNI) or SSL offloading, which ALB supports.
No Native Certificate Management- CLB lacks native integration with AWS Certificate Manager (ACM) for SSL/TLS certificate management, making SSL management more cumbersome
Limited Performance
Latency- CLB introduces higher latency than NLB, especially in scenarios requiring rapid response times.
Use Case-1- CLB to ALB
You have a web application that serves dynamic content through an application server and static content through an S3 bucket. The application is behind a Classic Load Balancer (CLB), which handles HTTP and HTTPS traffic.
Challenges with CLB
- Limited routing capabilities (only supports basic round-robin or sticky sessions).
- No support for path-based or host-based routing.
- No built-in Web Application Firewall (WAF) integration.
- Limited SSL termination capabilities.
Benefits of ALB
- Advanced Routing: ALB supports path-based and host-based routing, allowing you to route requests to different services based on the URL path (API requests go to one target group, while images go to another).
- Improved Security: ALB integrates with AWS WAF, protecting against common web exploits.
- Enhanced SSL Management: ALB supports SSL offloading, with for AWS Certificate Manager (ACM) support for easy certificate management.
- Better Monitoring: ALB provides more detailed CloudWatch metrics and logs for monitoring application health and performance.
Migration Steps
- Create an ALB: Set up an ALB with target groups based on your application’s architecture.
- Configure Listeners: Set up listeners for HTTP and HTTPS traffic, applying SSL certificates as needed.
- Configure Routing Rules: Implement routing rules to direct traffic based on the requested URL path or host.
- Test the ALB: Route some traffic to the ALB to ensure it functions as expected.
- Update DNS: Once testing is successful, update your DNS to point to the ALB.
- Decommission CLB: After verifying that the ALB successfully handles all traffic, you can safely decommission the CLB.
Use Case-2- CLB to NLB
Suppose a microservices-based application requires high-performance, low-latency traffic management, primarily using TCP or UDP protocols. This application is currently behind a Classic Load Balancer.
Challenges with CLB
- Suboptimal performance for low-latency or high-throughput use cases.
- Limited support for TCP and UDP traffic handling.
- Lack of support for static IPs.
Migration Steps
- Create an NLB- Set up an NLB and configure it to forward traffic to the appropriate backend services.
- Configure Target Groups- Define target groups based on your backend services and their protocols (TCP/UDP).
- Test the NLB- Gradually shift some traffic to the NLB to ensure it functions as expected.
- Update DNS- After successful testing, update your DNS to point to the NLB.
- Decommission CLB- Once all traffic flows smoothly through the NLB, decommission the CLB.
Why Migrate to NLB
- High Performance- NLB is designed for extreme performance and can handle millions of requests per second while maintaining ultra-low latency.
- TCP and UDP Support- NLB natively supports TCP and UDP, making it ideal for applications that require these protocols.
- Static IP Addresses- NLB provides a static IP per Availability Zone, simplifying DNS configuration and offering more predictable IPs for whitelisting.
- Elastic IP Address (Optional)- NLB can be associated with an Elastic IP, making it easier to manage inbound traffic.
Conclusion
Ensuring optimal performance, security, and scalability is essential for modern applications, but Classic Load Balancers (CLBs) often need to catch up due to their limited capabilities. Migrating to advanced solutions like Application Load Balancers (ALBs) or Network Load Balancers (NLBs) addresses these limitations and maximizes your application’s potential.
This guide has detailed steps for manually or automatically transitioning from CLBs to ALBs or NLBs, ensuring a smooth migration process. With features like advanced routing, improved security, and high-performance protocol support, these modern load balancers offer the flexibility and efficiency needed to enhance your infrastructure and user experience.


